
Do you want to get your pumpkin growing season off to a good start? Of course you do! As a result, it is important to understand pumpkin seed germination. Mother Nature has her own way of germinating pumpkin seeds. In the field, she provides warmth and energy from the sun, moisture from the clouds, and nutrients in the soil. Mother Nature also has a way of disappointing us from time to time by not bringing one of the ingredients that are essential to seed germination. Or, she sends too much all at once. So, understanding how to germinate pumpkin seeds is vital to early season success.
Germinating pumpkin seeds is a very important first step to a successful, perhaps record-breaking season. You can directly sow your seeds into the garden in most areas. You need about a 100 – 120 day growing season for most varieties of pumpkins. Giant pumpkins and other giant varieties require 130 to 150 days. People with short growing seasons, or growers pursuing the big one, need to get a jump start on the season by planting indoors.
If you are growing Atlantic Giants, Big Macs, Prize Winner Hybrids, or other giant pumpkin varieties, the seed coat is quite hard and thick. It makes germination a little trickier. There are some simple steps included below that you can perform that will help in the process of successfully germinating pumpkin seeds.
Following the steps below will maximize the likelihood of successful germination. Then, watch your seedlings sprout, as you are on your way to growing big, monster pumpkins and cute little wee ones too!
Note: If you have not yet prepared the planting site, do so now. It will keep you busy while you anxiously await the seeds to sprout. See Site Selection and Preparation.
The essentials for good pumpkin seed germination are:
TIP: Coating the seeds with a fungicide offers protection against mold and fungus growth.
Upon emerging from the soil, pumpkin growers breathe a big sigh of relief. Now, we can close our eyes and almost see a thousand-pound fruit nestled amongst lush, green pumpkin leaves. As we open our eyes, we immediately begin a new set of worries over nurturing the newborn seedlings in their indoor environment.
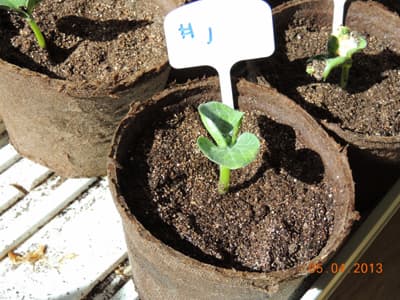
The newborn pumpkin seedling immediately needs light, as much and as direct light as possible. Placing it by a window with a southern exposure is the first step. However, this alone may not prove to be enough for the seedling to grow healthy and strong. First, the sun is not up as long in the spring as it is in the summer. Second, there are many rainy spring days with little or no direct sun. Use an artificial grow light. Or, use florescent lighting to supplement the available sunlight. Place the seedlings 6 to 8 inches below the light on cloudy days and at night, too. The seedling will benefit from as much light as possible.
Provide water to the pumpkin every couple of days. Do not soak the soil each day. Overly wet soil is one of the basic ingredients for damping off disease. Rather, let the soil dry out a little on the top first, then water thoroughly.
Your seedlings do not need a lot of extra nutrients in the first few days of its life. Your seed starting mix should have plenty of nutrients. The seed also has some energy stored inside of it. Then, after several days, add a little liquid fertilizer to the water. You do not need to give it full strength.
When the roots are coming out the bottom of the pot, it is time to plant your seedling into the pumpkin patch, weather permitting. Hopefully, you timed this to the last frost date in your area, or you have prepared a protective cover. If not, hold off transplanting them for a couple of days. Meanwhile, keep the bottom of the tray moist, or put some extra soil in the bottom of the tray. Or, transplant seedlings to a larger pot.
Those of us who have experience growing seedlings indoors know that “Damping Off” disease is the biggest worry. This is a white mold that forms on the top of the soil. Damping Off disease flourishes in cold, wet, damp weather, along with little sunshine. It quickly spreads across the soil and wilts the seedling. Take away its habitat, and the disease cannot survive. Pumpkins on the other hand, love just the opposite conditions. So, the more you make conditions ideal for pumpkins, the more likely you will avoid this problem.
If you do experience problems, do not give up hope. Here are some things you can do to minimize or eliminate disease problems:
The day you plant your seedlings is one of the more exciting and anxious days. Often, we start the seedling too early, and it grows so big that it needs to get into the ground. Or, perhaps it is not getting enough sunshine, or you want to get that jump start on the season. Whatever the reason, it is important either to wait until the risk of frost is over or be prepared to spend time protecting the young seedling from cold and wet conditions.
Note: If you direct sow seeds into the soil, you can plant earlier than seedlings. However, the seeds still need warm soil to germinate. While you can successfully grow giant pumpkins in most areas by direct seeding, you have taken a couple of potential weeks off of the growing season. If you are growing anything other than the giant pumpkin varieties, the season is amply long enough in most areas to direct sow your seeds.
I know, you plan to do what the rest of us do each year…..beat the season and plant early. After all, maybe there will be no more frost. If you do plant early, be prepared to cover up on cold or frosty nights.
Here’s how to get your growing season off to a good start:
Assuming you are a real pumpkin fanatic like me, you want to nurture your young prize producer in it’s toddler period. The most important thing to guard against is cold weather and frost. Frost will kill the plant and cold weather will slow it’s growth. Most people recognize the former, but are not as aware of the latter.
Build or buy a cold frame or use a simple hotcap to cover the plant on cold nights. It does not need to be large or elaborate as the plant is small, and you just need to maximize the overnight temperatures. A little scrap wood and plastic sheeting is all you need. Cover the plants on cool nights, even if there is no frost warning. Make sure to uncover them in the morning before or very shortly after the sun reaches them. If you forget and leave it on during a warm, sunny day, you will have some replanting to do when you get home from work.
As you surf the Internet you will find others who have gone to the extreme of providing small space heaters inside a hotcap or cold frame. These are people who are even more rabid fanatics than this writer. If you are in a northern climate with late springs(especially in Canada), you may need to consider this in order to provide the plant a long enough season to produce a monster pumpkin.
Gardeners who like this article on germinating pumpkin seeds will also like:
How to Germinate Seeds – It’s for both pumpkin seed germintion and other garden seeds. By The Gardener’s Network.
Germination Tests – Do this fun test to assure seed viability.

